• Skip to primary navigation
  • Skip to main content
  • Skip to primary sidebar

Home Norm

Home Improvement Products Reviews & Buyer's Guide

  • Blog
  • Garden Tools
  • Hand Tools
  • Home Tools
  • Power Tools

Ductless Mini Split Maintenance Guideline

Last Updated: August 10, 2019 | Joshua Houtson

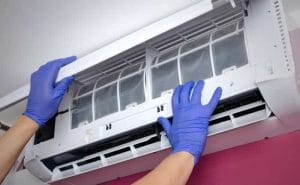
Ductless mini-split AC is the most effective and cost-efficient air conditioners, therefore, it is necessary to ensure that one is doing everything for ductless mini split maintenance to make it last longer.

5 Easy Tips to Maintenance A Ductless Mini Split AC

While there are some tips to follow enhance the workability of the system. Therefore, follow the 5 tips ductless mini split maintenance to keep it updated and functioning well.

Keep It Clean

Keep the system clean of dust and other tiny particles which can harm it in any way. In case, the dirt and other particles acquire at the unit, they could easily go inside the working areas of the system. As a result, creating troubles in the system.

Ductless Mini Split Maintenance

So,  make certain that the ductless mini-split is always clean or clean it at least once a week. To do this, wipe the outside with a moist piece of cloth or with a chemical.

Also, ensure that the outside parts of the filters are dust-free from something can obstruct the system causing malfunctions. Consequently, this easy tip can substantially reduce expenses later.

Place It Between A Wide Space

Whilst ductless mini-splits need much less area in comparison to a common air-con unit, they work well in case they have enough space to function. To make it run easily, the unit desires sufficient space to operate.

Ensure to provide the system 4-feet of the area in each route, except the walls. Avoid keeping bookcases or even photographs close to the ductless aircon unit. However, clearing the gap will save from troubles and make certain, the system is operating efficaciously.

Clean Condenser

Additionally, preserve the outside part of the system. Since this element is important to the ongoing function of the unit, so make certain to regularly clean the condenser.

Outside dust and particles can also be accumulated in this section of the system, stopping it from running. If not keeping it maintained, it can stop the whole unit from running and create harm.

To keep it maintained, make sure that the additives are off. Then use the hose to wash the system. Once this process is complete, ensure to keep fins straight.

Now, dust off the ruins if found with using a hand, and ensure that the system is absolutely dried off while performing this action. Include this chore in the weekly cleansing to-do list to make sure that the ductless mini-split is under maintenance.

Pipe Cleaning

The pipes are important in letting the warmness or coldness into the house. Also, they work as pathways among the outdoor and indoor additives of the device. If left unmaintained, dust and different particles can acquire and obstruct clean air from coming into the house.

This prevents the ductless mini-splits from operating. Also, pipes can broaden leakages, that stop proper operation. Therefore, check those pipes now and then to make sure they stay clean.

That is a simple tip to follow while cleaning the air filters, hence, ensure to do the task often.

Take the Help of An Expert

Whilst there is lots to do to keep the system maintained, one may also take the help of an expert for taking a glance to ensure that the system is working accurately. Before hiring a mini-split expert, make sure to ensure they have expertise in this field.

An educated expert should examine a particular ductless mini-split about once in every 12 months. Throughout this inspection, they will observe the drainage hoses and make sure that they are free from obstructs or leakages.

Furthermore, they’ll check out the power connections to run condensers. If they find any problems with the system, the experts will carry out repair and replacement function to help the ductless mini-split gives the optimal output.

Checking regularly can assist to save larger problems later. Even as it may be right to follow some of those items oneself, one may risk the lifespan of the system by damaging it without using any expert’s help.

Conclusion

Ductless mini split maintenance is critical and useful gear for growing a secure residing area, but leaving the system unmaintained can however, diminishes its effectiveness.

As a result, follow the above 5 tips for ductless mini-split air conditioners to ensure that the system is functioning well and conveniently.

Filed Under: Blog, Power Tools

Ductless Mini Split Air Conditioner Installation Steps (DIY Guide)

Last Updated: August 10, 2019 | Joshua Houtson

When someone gets a new ductless mini-split air conditioner, they tend to get worried about how to install it. To make it easier for them, we have created this guide ductless mini split air conditioner installation steps.

In this article, we will shed light on the steps taken to install the ductless air conditioner effectively. Also, the steps mentioned in this article can also be followed to install the air conditioner in any room of the house. Whether it’s an office, bedroom, TV lounger, and other rooms.

Let’s first talk about that a ductless air conditioner is.

What is Ductless Mini AC?

Almost each air conditioner utilizes the exact outside condenser and coils to generate the cold refrigerating which helps to cool the air in the home.

Furthermore, using ductless mini AC, anyone can regulate the temperature around the house without any extra consumption of the energy. That too, without comprising the function of the AC.

Steps of Ductless Mini Split AC Installation

Here, we will talk about the steps that are essential to follow in order to install a ductless mini-split AC, and the steps are:

Step 1

First of all, turn off the electricity to avoid any short circuit. Take the mounting bracket and place it to the wall. Put an outline over the locations for fixing the screw holes.

Step 2

Bore a hole of about 3 diameters into the wall, for the reason that the electrical cable of the unit may pass through the interior and exteriors of the house.

Step 3

Fix the mounting bracket with the wall by inserting screws because of it being steady. However, ensure it is even with the wall.

Step 4

While the mounting bracket is now fixed to the wall, install a mini ductless air conditioner. While doing this process, pass through the refrigerating lines and discharge line using the hole drilled into the wall.

Step 5

Fix a perpendicular chase straightly under the hole in the wall since the chase will fix the refrigerating lines, electrical cable, and discharge lines.

Step 6

At this step, enlarge the condensate line a few inches below the surface by adhering it with a PVC pipe. Also, tighten the discharge line with the pipe using duct tape. Furthermore, fix the lower side of the PVC pipe with the chase through screwing over a C-clamp of metal.

Step 7

Make sure to curve the refrigerating lines below the chase. At this point, utilize two wrenches (adjustable) to loosen the fitting of the compression from the sides of copper wires.

Step 8

Insert a nut made of brass into the length of the copper wires, also, use a flaring tool in order to flare the sides of the wire. Keep holding the end’s of the flared wire toward the edge of the refrigerating wire coming through the aircon.

Step 9

Another step is to tighten the nut for holding the copper wire with the refrigerant wire. Continue this procedure to attach another refrigerant wire.

Step 10

Install the outside condenser unit above the pad after attaching the chase. After that, make sure to utilize two wrenches that are adjustable in order to fix the fittings of the compression on the refrigerating wires.

Step 11

Likewise, at this point, cover the pipe insulation surrounding all the wires. Do not forget to install a weather-tight duct from the outside of the power box with the condenser system. As a result, install the electric wires with the duct.

Step 12

Try to move a electric cable that is non-metallic and sizeable in terms of length, through the condenser system toward the hole that was drilled into the wall, all the way to inside the air conditioner system.

Step 13

The most noteworthy thing to note at this point is to separate the cover from the chase in order to hide the wires and cables attached. So they don’t get any kind of dust or other damage.

Step 14

While following the above steps, the next step is to create an electrical connection between the condenser and the air conditioner, after that take a test of the system by providing pressure on it. (to provide pressure, use nitrogen gas of about 300 pounds / square inch in quantity).

Step 15

Also, at this step what you have to do is empty the nitrogen into the condenser, make sure to open the valves for the purpose of releasing refrigerating through the condenser to the air conditioning system.

Step 16

Finally, at the last step, turn the electricity on to test if the air conditioner is working.

There are a few other instructions that come with the system in the guide book, to test the system, go through the guide. Read to make sure to follow the process for testing if the air conditioner is operating efficiently.

Conclusion

We hope that this guide may have cleared your doubts and provided you some valuable insights for ductless mini split air conditioner installation. This task is not so difficult, one can also do it themselves without any hassle.

Filed Under: Blog, Power Tools

How to Cut 2×4 with Circular Saw

Last Updated: July 9, 2019 | Joshua Houtson

It is very difficult to cut 2×4 with the hand saw using one’s hand. Hence, anyone can do it easily when they have an approach to a circular saw for cutting 2×4.

In this article, we will let you know an effective method to cut 2×4 with the use of a circular saw. However, first of all, let’s have an idea of what a circular saw is. Only then, we will move to learn how to cut 2×4 with circular saw.

How to Cut 2x4 with Circular Saw

What is Circular Saw?

The circular saw is an extremely sturdy tool to cut 2×4 logs of wood and other materials lots quicker and accurately in comparison to the hand saw.

Easy Ways to Cut 2×4 with Circular Saw

The easiest ways to cut 2×4 with the circular saw are written as follows:

Observe the Saw and Blade

First of all, examine if the saw and the blade of the saw are in working condition or not. Since any sort of complication in the saw or its blade will cut inaccurately, which will additionally harm the wood.

Also, make sure to verify the edginess of a saw blade due to the fact a muted blade will break the wood. In the situation of using a wireless saw, make sure the battery is full. In contrast, the task will get stuck.

Now, take a look at the teeth of the blade to check if it has cracks anywhere. To do this, unplug the machine from the charging socket to avoid damage. If teeth are not edgy or sharp, replace them, since it may ruin the material.

Depth of the Blade

If the teeth and the blade of the saw are okay, continue to check the depth of the blade. To do that, unplug the tool and keep the blade toward 2×4 wood. simply unplug the noticed and hold the blade towards the 2×4 lumber. Then, alter the intensity till the blade is ¼ inches beneath the wood. However, keep it under 1 inch and tighten the blade.

Wood on the Saw Stand

At this point, hold 2×4 onto the saw stand. Consequently, it will assist to maintain the wood to remain constant and cut effortlessly and appropriately.

Supporting the Side of the Wood

Keeping the timber on the stand, assist it from one facet, not from two facets. Because the extra pieces will fall till the secured facet. In any other case, the wood will turn down and the saw may not cut as accurately.

Therefore, try to hold onto one side to get a nice and smooth cut. Also, keep clamping the wood’s part that is fixed to the stand till the process is done.

Use a Pencil for Creating an Outline

Here, make an outline using a pencil and a ruler. For the fact that it will assist in guiding the saw easily and acquire an exact cutting outcome.

Enjoy While Cutting

Keep the blade of the saw at one facet of the outline and cut easy conserving the velocity of square’s stakes toward the brink of 2×4 material. In case, the blade becomes transferred from the outline, at the same time as cutting, just flip off the circular saw fast and stop its movement. If the blade is not moving or working, remove the circular saw from the outline and place again in the direction of the cut.

Conclusion

With the help of this article, one may have gotten the idea of how to cut 2×4 with circular saw. Keep doing it until you get accurate results. Since it is not so difficult to get an accurate and fast cut with the help of a circular saw.

Filed Under: Blog, Hand Tools

Easy Ways for Pine Tree Identification by Needles

Last Updated: July 9, 2019 | Joshua Houtson

Pine trees tend to pass through their essential chore changing energy through the solar light into the food, they require to develop and live on – photosynthesis. Putting it differently – through green leaves with a specific shape shared via many different conifers are needles.

Likewise, another tree range’s from basic leaves, pine needles need to absorb and discharge the gases included in photosynthesis, inhalation, and even alter water deprivation which is known as transpiration.

pine tree identification by needles

Transpiration is a particular good-sized problem within the dry weather where mostly moderate and subtropical species of pine blossom. So, let’s have a look at some ways for pine tree identification by needles. After identify, you need to clean it. And if you like to clean pine needles you can buy rake for pine needles. Which is really helpful.

Steps to Identify Pine Tree by Needles

Let’s first identify the pine trees through the size of the needles in length.

13-18 Inches in Length

Those are a number of the lengthy needles on pine trees someone could ever discover. Longleaf evergreen or Pinus palustris own needles that are about eight to eighteen inches lengthy and develops at a charge of twenty-four to thirty-six inches every year.

Torrey pine is as Pinus torreyana has to bear about eight to thirteen inches lengthy needles and develops at a charge of thirty-six inches each year.

Moreover, both these trees develop about sixty-five feet tall with very massive cones that are over three inches in length.

8-12 Inches in Length

Assume needles eight to twelve inches in length while someone plants those pine bushes that develop at about sixty-five ft tall. Additionally, feature very massive cones that are over three inches in length.

In contrast, Coulter pine which is also called Pinus coulteri increases twenty-four to thirty-six inches per year.

Whereas gray pine which is referred to Pinus sabiniana, additionally called digger pine, increase at thirty-six inches yearly. This tree is extremely dryness receptive and produces cones in autumn.

Around 10 Inches in Length

These pine bushes include needles of about ten inches in length in the garden or lawn. Slash pine, also known as Pinus elliottii generates needles seven over ten inches in length, owns very tiny cones.

Likewise, Ponderosa pine which is called Pinus ponderosa represents needles that are about five to ten inches in length and possess extremely massive cones of about three inches in length in the summer season, autumn or wintry weather.

4 to 6 Inches in Length

Assume these needles are at least four to six inches in length on those pine trees. Since the Monterrey pine, also referred to as Pinus radiata, develops about eighty to a hundred ft tall.

In contrast, the Bishop pine, known as Pinus muricata, which huge cones of about one and a half to three inches in length in the summer season, autumn or winter. However, both these trees develop around thirty-six inches every season.

Special Clarification of Pine Trees

Pine trees identification by needles in terms of shape. The irregular streaks leaves of every pine tree types are called “needles” due to their lengthy and thin form. However, the scrawny leaves develop in spirals encompassing the branches that grow from the more abundant twigs of the evergreen tree.

Therefore, the needles stay in spirals known as “candles” which befall from a tree following every 2 years to build a kind of carpeting beneath the tree.

Furthermore, the carpet of these old and befallen needles beneath pine trees is known as “duff.” similarly, this duff may suppress different variations of bushes from developing, allowing the pine to form an edging in populating the place.

It may additionally capture fire and burn out rapidly, preventing a lightening hearth from expanding to greater combustible kinds of pine trees.

The slick exterior coating of the evergreen tree needles allows saving the tree of missing water within its smooth exterior parts. This enables the tree for doing well in dried situations. While brush fires show up in a pine tree, but the aid of the slick needle in the tree to stop catching fire.

Conclusion

Pines are evergreen trees and they usually don’t own normal leaves similar to trees. Rather, they possess needles. One can easily recognize a pine tree with it’s different and unique needles.

However, pine tree identification by needles can be through the texture of the needles because they are thick and also point. By touching a needle, if that is length yet bendy, get assured that is a pine tree needle.

Filed Under: Blog, Garden Tools

Best 7 Ideas of How to Clean Up Pine Needles from Rocks

Last Updated: May 19, 2020 | Joshua Houtson

Enduring pine trees may be very pretty, however, they cast off their pines immensely. Every person who owns any such tree in their garden close to rocks is aware of how complicated the pines are to clear out.

Additionally, there are various methods to cope with the hassle, and it’s right to recognize the available options. Let’s have a look at how to clean up pine needles from rocks. Hope, you have rake for pine needles to do it. So lets go. Because we will use it to clean pine needles from rocks.

How to Clean Up Pine Needles from Rocks

What is Pine Needles and How to Use it?

Putting off pine needles from rock gardens offers a distinct mission since their size is small.

Due to the absolute size of the needles, it is rough to round up manually. Furthermore, pine needle is extraordinarily light, in order that they may be very difficult to pick up while they get caught in rocks.

7 Best Ideas to Clean Up Pine Needles

Well, here are top 7 best ideas to clean up pine needles from rocks. Hope you will like these ideas.

1. Leaf Sweeper

Utilizing a leaf sweeper is really a pleasant way for sweeping pine needles. To use it, make certain to propose the sweeper toward the end of the rock to make them blow out instead of blowing in.

One of the great things for utilizing a leaf sweeper to clean up pine needles is that no one needs to depend on the strength of the device.

These pine needles are tiny and light in weight for making the job easy.

The backpack leaf sweeper is absolutely the most efficient method to pile up the pine needles. Furthermore, these sweepers are extremely sturdy and could without a doubt be capable of clearing up the hassle in a few seconds.

The sweeper runs on the electric setting which is sufficiently robust for moving needles, however, it can’t move rocks.

Additionally, in case someone owns a rock lawn with some grown plants, the sweeper will work on the least electric setting. In contrast, the airflow may be sturdy to harm the plants.

2. Vacuum Sweeper

A few individuals utilize a vacuum sweeper in place of leaf sweeper, although they may be not as efficient at this chore. So, if only someone thinks they could handle the device, they can try it once. Though it is the best choice for small lawns.

3. Pressure Washer

Folks who appear to possess a pressure washer may assume that this specific piece of a gadget is efficient to clean rocks. That is the simplest choice for individuals who need to take pine needles out the rocks.

It is not really productive when the rocks are tiny as they may be cleaned away as well. Or if there are plants in the garden. Since this washer is so powerful to damage them.

A facet advantage of the use of this technique is that the rocks become clear with no stains in a few minutes. But that is genuinely not a great approach for absolutely eliminating pine needles and leaves among rocks.

4. Broom

While coping with big rocks, a broom may also be beneficial to sweep the garden. The needles get swept from the ground to arrange them prior to picking them with hands.

The technique may take some time when there are a number of pine needles, therefore, it must be kept in mind. Additionally, this may work in case the rocks are massive, and space among them is broad for the broom to get in.

There is still an option of utilizing a vacuum to get off the needles when the broom dislodges them among the rocks and pebbles.

5. Tape

Additionally, recall the usage of tape to get off many pine needles at one go which might be attached on the rocks. Likewise, duct tape may be especially useful in this example or utilize packaging tape which is sticky and sturdy.

This is a great technique to pick up a few pine needles. Otherwise, using just tape to pick out all the pine needs is a very time-taking task.

A lint spender (which include the type to get rid of puppy hair from garb and furniture) may be beneficial for this cause.

Just flow the curler to and fro on pine needles till the adhesive material is ready for peeling back to show some other layers. This may take time, however, it’s an efficient technique in case the lawn is nicely prepared.

6. Wipe or Clean Them

A sticky wiper or cleaner may also be useful for getting of pine needles. As soon as, the mop gets full, rinse the pine needles using water and collect them in a utensil.

Also, throw away the needles if needed or utilize them for any other reason. However, this best works in a case dealing with massive rocks. In any other case, the rocks will get moped too.

7. Utilize A Spade

There’s even a choice of the usage of a small lawn spade to gather pine needles. Though, this may additionally carry up not so much of the dirt, that could make it an undertaking job.

If the rocks do not have dirt around them, use this technique for best results.

Conclusion

Now that we have made it clear how to clean up pine needles from rocks, use any of the methods above to get the best outcome and enjoy hassle-free life in the garden.

Filed Under: Blog, Garden Tools

  • Go to page 1
  • Go to page 2
  • Go to page 3
  • Go to Next Page »

Recent Buying Guides

  • Best Sports Bra for Saggy Breasts in 2021 – Reviews & Buying Guide
  • 11 Best Over the Knee Boots for Petites in 2021 – Reviews & Buying Guide
  • Best Miter Saw For Beginners in 2021 – Reviews & Buying Guide
  • Best Hand Saw For Cutting Trees in 2021 – Reviews & Buying Guide
  • Best Miter Saw Blade for Trim Reviews in 2021 & Buying Guide
  • Best 12 Inch Miter Saw Blade Reviews 2021 & Buying Guide
  • Best Table Saw Under $500 in 2021 – Reviews & Buying Guide

Homenorm is reader-supported website. When you buy through links on our site, we may earn an affiliate commission. Learn more.

  • About Us
  • Image Credits
  • Affiliate Disclosure
  • Contact Us
  • Privacy Policy

Copyright © 2021 · Home Norm · All rights reserved.

Featured on Hometalk.com DMCA.com Protection Status

My website is a participant in the Amazon Services LLC Associates Program, an affiliate advertising program designed to provide a means for sites to earn advertising fees by advertising and linking to Amazon.com.