• Skip to primary navigation
  • Skip to main content
  • Skip to primary sidebar

Home Norm

Home Improvement Products Reviews & Buyer's Guide

  • Blog
  • Garden Tools
  • Hand Tools
  • Home Tools
  • Power Tools

Best Daily Shampoo for Hard Water in 2021 – Reviews & Buying Guide

Last Updated: April 2, 2021 | Joshua Houtson

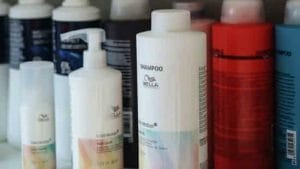
It’s a big problem if you are living in a place where water came from the faucet is hard water. And you have no best daily shampoo for hard water. Although, this kind is not bad for your health, hard water can damage your hair and skin.

That is why, this article will help you pick daily shampoo to avoid hair damage.

This article will help you choose the best shampoo for everyday use. We will share to you the top shampoos that you can consider. The following product are carefully chosen just only for you!

Best Daily Shampoo for Hard Water 2021

Features of Hard Water Daily Shampoo

Shampoo for hard water is not the same as with ordinary shampoos. It contains specialized formula to strip off minerals that makes the hair looks dry. Here are some of the benefits of hard water shampoo.

Eliminates Hair Fall

Hard water shampoos offer help to get rid of too much hair fall. Due to stress and hormonal changes as we aged, numerous hair stands start to fall. Most especially when a woman is in her menopausal stage.

However, there are shampoos for hard water that promote hair to be strong. When the hair is strong, breakage is avoided then, hair fall will be mitigated.

Thickens Hair Strand

Hard water damages the hair follicles, but this shampoo is on the rescue. This product has the ability to make your hair thick once more.

It stimulates the hair roots to produce new hair cells but stronger and thicker this time.

Moisturizes the Hair

One major effect of hard water is the hair became very dry and damage. Most especially if you have a hair that is chemically treated. Hard water has a high amount of minerals that are harmful to your hair and lead to dryness and breakage.

But, shampoo for hard water has a formula that nourishes and moisturizes your hair. It cancels the damage and breakage.

Top 7 Daily Shampoo for Hard Water Reviews

Since our main concern is your goodness and we really want to see you with your beautiful hair, we carefully chose top 7 among the rest.

These top 7 shampoos for hard water are the most reviewed product.

1. PURA D’OR Original Gold Label Anti-hinning Shampoo

Check Price on Amazon

This shampoo leads to the top when talking about treatment for thinning hair. With its herbal ingredients, it promises to make your hair grow thicker and fuller.

Moreover, PURA D’OR Original Gold improves the appearance of your hair. Say no to dry scalp.

Pros
  • Stops falling hairs.
  • Strengthens the hair.
  • Reduces oil.
  • Adds hair volume.
Cons
  • Hair gets hard to comb a little.

If you are looking for the best shampoo for hard water areas, you can check PURA D’OR Original Gold. This product will help you with your hair fall problem. Its strengthening ability preserves your hair from breaking.

2. Neutrogena Anti-Residue Clarifying Shampoo

Check Price on Amazon

Neutrogena Anti-Residue Clarifying Shampoo removes dull residue by wrong previously used shampoo, styling product and conditioner. Too much use of hair products with strong synthetic chemicals caused dullness.

In addition, this shampoo cleans your hair without causing irritation.

Pros
  • Makes your hair feel lighter.
  • Cleanses your hair.
  • Great for sensitive scalp.
Cons
  • Bit drying.

This product is what you are seeking for it you want to make your hair feel lighter and bouncy. Neutrogena Anti-Residue Clarifying Shampoo is the best shampoo for hard water. It anti irritation property is suitable to your scalp.

3. PURA D’OR Biotin Original Gold Label Anti-Thinning Shampoo & Conditioner Set

Check Price on Amazon

This product decreases hair thinning and promotes thickness. It also reduces hair breakage as the primary problem of most women. Moreover, this best shampoo and conditioner for hard water is clinically proven to prevent hair fall and breakage.

Pros
  • Promotes hair growth.
  • Lightweight hair.
  • Good smell.
  • Softens and shines hair.
Cons
  • Conditioner is very thick.

PURA D’OR Biotin Original Gold set is good for your hair. Its gorgeous smell will surely perfect for your nose. In addition, this set is proven to reduce hair breakage. This is the answer for your prayer surely.

4. Malibu C: Natural Protective Hard Water Wellness Kit

Check Price on Amazon

This kit eliminates toxins from your hair due to hard water’s mineral build up. This best chelating shampoo for hard water comes in kit. The combined set helps you combat the dryness in your hair.

Moreover, Malibu C: Natural Protective Hard Water Wellness Kit purifies hair strand for a perfect result. This best shampoo for dry colored hair will preserve your hair blonde.

Pros
  • Good even for blonde.
  • Great scent.
  • Softens hair.
Cons
  • Not so good for black hair.

This best clarifying shampoo for curly hair or any hair types is perfect for you. Additionally, it is better when used in blonde hair. Consider these products if you want to have as soft hair since it starts its treatment to each strand.

5. ION Hard Water Shampoo

Check Price on Amazon

This one is the best shampoo for swimmers with color treated hair. Hard Water Shampoo smoothens and moisturizes your hair to give a shiny effect. Moreover, this shampoo makes you enjoy a light and super clean hair.

Pros
  • Cleans the hair thoroughly.
  • Removes buildup.
  • Price friendly.
Cons
  • Not so good scent.

If you want to have a shiny and moisturized hair, consider Hard Water Shampoo. This best shampoo for hard water remove buildup from your hair due to minerals present from the water. Most especially for the swimmers out there, this one is best for you.

6. Pantene Moisturizing Shampoo and Conditioner

Check Price on Amazon

Pantene set locks in hydration from the very root of your hair until the tip. It is best shampoo for daily use because of its daily moisture renewal system.

Moreover, it makes your hair silky soft and resists damage. Its formula is safe for colored hair that is why it is the best shampoo for dry color treated hair.

Pros
  • Great for colored hair.
  • Smells good
  • Makes hair shiny.
  • Moisturizes hair.
Cons
  • Greasy.

If you have a dry hair problem, Pantene set is great help for you. Its specialized formula is great for your chemically treated hair.

7. Baxter of California Daily Fortifying Shampoo

Check Price on Amazon

This shampoo has wheat protein and vitamin E to treat hair and scalp. Baxter of California Daily Fortifying Shampoo is the best daily shampoo for hard water. Its strengthening system repairs and cleans your hair without making it dry.

In addition, its mint sensation formula supports your active lifestyle without making your hair smelly. This brand also offers the best body wash for hard water.

Pros
  • Refreshing scent.
  • Softens your hair.
  • Controls dandruff.
Cons
  • A little expensive.

If you have a dry hair, consider Baxter of California Daily Fortifying Shampoo. Furthermore, if you are suffering from a dry and lack of nutrients hair, this will surely help. Its vitamin E pampers every strand of your hair.

Buying Guide

To make it easier in your part, we prepare some buying guides so that you will not regret in purchasing a shampoo for you.

You can consider these to make sure that you will the best for you.

Scalp Type

What kind of scalp do you have? Is it oily, normal or dry? You are lucky if you have a normal scalp. How about those who have oily scalp? If you have oily scalp, do not purchase shampoo with moisturizing formula. It will surely produce more grease.

However, for those with dry scalp, moisturizing shampoo for hard water is perfect for you.

Texture of the Strand

It is not appropriate to purchase any kind of shampoo for hard water. One thing to consider is the hair type of the user. Do you have a normal, thick, or thin hair?

Furthermore, if your problem is your thinning hair, choose those shampoos with the feature of making the hair thicker.

Same thing as with the kind of your hair strand. Is the product you are planning to buy is good for you if you have a curly hair? How about for the straight hair?

The Ingredients Used

Since the purpose of using shampoo for hard water is to treat the damaged hair from the kind of water, consider its ingredients. Failing to check the content of the shampoo may make the situation worse.

Additionally, avoid shampoos that has sulfate as part of the ingredients in manufacturing.

Hair Type

Is your hair still untouched by chemicals, or it is already chemically treated? Ask this question first before placing a product in your basket.

There are products that make your hair even worse since it reacts to the chemicals present in your hair during treatment.

Moreover, try to check if the shampoo is good for the blonde or in black color only. Some works for blonde but not with black, and vice versa.

Condition of the Scalp

Try to check your scalp. If you have dandruff, look for a product that will definitely help you to combat that problem.

Additionally, you also check the sensitivity of your scalp. Do not use shampoo that may trigger allergy in your head.

Acidity of the Shampoo

Naturally, the human’s scalp has its own acidity or pH-level. However, when you use shampoo that has the acidity more than your scalp, it makes your hair strand brittle. It will later on promote hair breakage.

Furthermore, super acidic shampoos make hair dull and very thing. So, instead of recuing your hair, it cannot help. If you have a dry hair, choose a product that has a low pH level to moisturize your hair.

Hair Problem

Lastly but the most important is the kind of problem your hair is experiencing. Do not buy any hair product without identifying first what is the problem with your hair.

You should be aware of the condition of your hair at the beginning. You are near to failure if you purchase without checking what you want to treat.

For example, your problem is the brittle hair that you have because of hard water. It is not appropriate to purchase moisturizing shampoo since your problem is its brittleness at the first place.

To make your expectation realistic, try to figure out what specific hair problem you want to address. By doing so, you can at least assess later whether the product is good or not for you.

Daily Shampoo for Hard Water FAQs

At this point, we give the frequently asked questions with its answer to help you make a better decision.

Q1: Are all products with great smell bad for your hair?

Answer: Not all, but many of artificial fragrances in shampoo are often made from chemicals. Artificial fragrances are harmful to the hair.

Q2: Is that mean the more expensive the shampoo is, the more effective it is?

Answer: Not all the time. Check for the buying guide to that you will see what to look for. Cost is not an assurance of the product’s quality.

Q3: Can I still use men’s shampoo even if I’m a woman, or vice versa?

Answer: actually, if we talk about facts, it there is no problem with that. However, the scent of men’s shampoo is different form women’s.

Q4: How often should I use my shampoo for hard water?

Answer: It is safer to use shampoo for hard water for once to twice a week.

Q5: What pH level should I look in a shampoo for hard water?

Answer: It should be between 3.5 to 5.5 pH value to make sure that the level of acidity is good for the hair.

Q6: How will I know if the shampoo for hard water I want to purchase can help me with my oily hair?

Answer: Consider these ingredients in the product; acetic acid and sulfates.

Q7: How long should I leave the shampoo in my hair before rinsing?

Answer: Leaving it for too long can damage your hair. Make sure not to leave it more than 5 minutes.

Q8: What is the effect of using soft water in taking a bath?

Answer: It can give your hair a greasy effect. Best shampoo for soft water are also rampant in the market.

Final Verdict

This article will surely help you a lot in selecting the best daily shampoo for hard water for you. Choose the shampoo that best treat your specific problem. Make a wise buy.


Similar Articles:
  • Top 5 Dirt to Use Around Foundation of Home – Reviews & Buyer’s Guide
  • Best Paint for Bathroom Ceiling to Prevent Mold – Reviews & Buyer’s Guide
  • Best Socks For Walking On Concrete – Reviews & Buyer’s Guide

Filed Under: Home Tools, Reviews

Best Paint for Bathroom Ceiling to Prevent Mold in 2021 – Reviews & Buying Guide

Last Updated: April 2, 2021 | Joshua Houtson

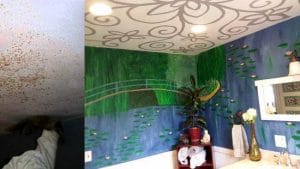
You are here, because, you are looking for best paint for bathroom ceiling to prevent mold.

Right?

Certainly, your bathroom is one of the wettest spaces in your home. So, there’s a high risk of mold growing on bathroom ceilings. If you’re having serious problems with mold stains, pay close attention.

In this article you’ll find a top 7 list with the best paint for bathroom ceilings. You’ll also learn what type of paint is best for a bathroom.

Best Paint for Bathroom Ceiling to Prevent Mold 2021

Features of Paint for Bathroom Ceiling to Prevent Mold

Certainly, applying the best paint for bathrooms is the best way to prevent mold. However, there are so many benefits you can get from using the best bathroom paint to prevent mold. Here are some of them.

Easy to Apply

Certainly, best paint for bathroom cabinets is very easy to apply, because:

  • You don’t need to be an expert to do it.
  • You don’t need fancy tools.
  • All instructions included with the product.
  • You just need to apply 1 or 2 coats of paint.
  • You don’t need to combine it with other products.

Safe

Above all, best paint for bathroom walls is safe, because:

  • Low odor.
  • Non-toxic.
  • Ammonia free.
  • It doesn’t pollute the environment.
  • You won’t need a respirator to apply it.

Top 7 Paint for Bathroom Ceiling to Prevent Mold

Are you having serious mold problems on your bathroom ceiling? Don’t worry. In this top 7 list you’ll find the best paints to solve that problem.

1. Zinnser Covers Up Ceiling Paint

Check Price on Amazon

Above all, Zinnser Covers Up Ceiling Paint is the best paint to use in bathroom. This oil-based paint also covers all kinds of stains on bathroom ceilings. Certainly, this is the best product to have beautiful ceilings all the time. Also, it has a low odor.

Pros
  • Easy to apply.
  • It works well on smooth and textured surfaces.
  • Low odor.
Cons
  • Average for moisture stains.

Certainly, Zinnser Covers Up Ceiling Paint is a low-cost alternative to a paint sprayer. It’s also very easy to apply. In addition, the paint is thick. So, it won’t drip if applied on ceilings or sloping surfaces. However, it isn’t the best product to cover moisture spots.

2. Paint-Guard Mold Prevention Additive

Check Price on Amazon

Certainly, this is the best mold killing primer. In addition, you can add this liquid product without risk of ruining the paint. It’s also a non toxic product and contains no ammonia. Paint-Guard Mold Prevention Additive increases the durability of the paint, preventing mold growth.

Pros
  • Non toxic.
  • Easy to apply.
  • Doesn’t contain ammonia.
Cons
  • It may dilute the paint.
  • Mold may grow after applying the product.

Certainly, Paint-Guard Mold Prevention Additive keeps your home and family protected. In also prevents mold growth on any type of surface. In addition, it’s very easy to apply and doesn’t affect the quality of the paint. However, you have to add too much to get good results.

3. Glidden Latex Ceiling Paint

Check Price on Amazon

Certainly, Glidden Latex Ceiling Paint gives you more for the price. Its superior performance guarantees maximum coverage with a single coat of paint. In addition, its intense color hides spots and defects quite well. Also, it has a low odor.

Pros
  • Superior coverage.
  • Low odor.
  • Thick consistency.
Cons
  • Dries very quickly.
  • Average paint for textured surfaces.

Certainly, Glidden Latex Paint has a superior performance on bathroom ceilings. You don’t need to apply too much paint to guarantee the best results. Also, it has a low odor, which will quickly disappear. However, it isn’t the best product for textured ceilings.

4. Benjamin Moore Latex Ceiling Paint

Check Price on Amazon

Benjamin Moore is the best type of paint for bathroom. Also, it has a thick consistency. So, it won’t drip after applying it to bathroom ceilings. Also, it forms a protective layer on drywall and other porous surfaces.

Pros
  • Easy to apply.
  • Intense color.
  • Thick consistency.
Cons
  • You’ll need to apply multiple paint layers on textured surface.
  • It may dry too quickly.

Certainly, Benjamin Moore Latex Ceiling Paint in an amazing product. In addition, you don’t need to apply too much to get good results. It’s also very thick and easy to apply. However, it tends to dry very quickly.

5. Valspar Color Changing Ceiling Paint

Check Price on Amazon

Certainly, you’ll love this product. It has a light purple color when is wet. That way, you can easily differentiate the painted and non painted areas. Then, it turns white when it completely dries. In addition, a single coat is sufficient to obtain a uniform finish.

Pros
  • It changes its color.
  • Easy to apply.
  • Low odor.
Cons
  • It may dry too fast.
  • Sometimes the purple color doesn’t go away.

Certainly, Valspar Color Changing Ceiling Paint makes the painting process much easier. Also, it indicates you which areas need more paint. However, it dries too quickly. Also, the purple color doesn’t disappear in some cases.

6. KILZ Color-Change Ceiling Paint

Check Price on Amazon

Certainly, KILZ Color-Change Ceiling Paint covers stains and defects better than any other product.  Also, it changes its color to indicate which areas need a second coat. In addition, it’s very easy to apply. It also has a superior performance on both smooth and textured surfaces.

Pros
  • It changes its color.
  • Low odor.
  • Thick consistency.
Cons
  • It has a pale yellow color when dry.
  • Not the best product to cover too dark spots.

Certainly, KILZ is one of the best paint brands on the market. This product is especially effective on stained ceilings. Also, a small dose of paint can make a large stain disappear forever. However, the white paint tends to turn yellow over time, which is very disappointing.

7. Red Devil ONETIME Lightweight Spackling

Check Price on Amazon

Ideal for filling holes on walls and ceilings. Also, it becomes solid when it dries. So, it won’t crumble during the sanding process. In addition, it’s ideal for drywall, plaster, wood and stucco surfaces.

Pros
  • Easy to apply.
  • Thick consistency.
  • It doesn’t need too much sanding.
Cons
  • It doesn’t adhere well to the surface.
  • Too diluted product.

Certainly, Red Devil ONETIME Lightweight Spackling is very easy to apply. However, it isn’t the best product of all. It doesn’t adhere well to the surface and doesn’t resist the effects of gravity.

Buying Guide – Prevent Mold Paint for Bathroom Ceiling

Certainly, bathrooms are constantly exposed to high humidity levels and pathogens. Therefore, bathroom ceilings are prone to stains. Fortunately, this problem has a simple solution. With one or two coats of paint, your bathroom ceilings will certainly look like new.

However, not all types of paint are suitable for bathroom ceilings. For these purposes, paint must have a thick consistency, low odor and superior performance. So, you must verify that the paint you’re going to buy has these desired features.

If this is your first time painting your bathroom ceilings, you’ll certainly need help. In this buying guide you’ll know all the factors that you should consider for making the best decision.

Consistency

Gravity is certainly the worst enemy of paint for bathroom ceilings. If the paint doesn’t properly adhere to the surface, it will begin to drip after it’s applied. This problem happens very frequently with too dilute products.

If you want the best results, the paint should have a thick consistency. That way, it will better resist the effects of gravity. Also, the paint should have a short drying time to reduce the chances of dripping.

However, if the paint is thicker than necessary, it will be very difficult to apply. In addition, a considerable amount of paint will adhere to your brushes and painting rolls. If you’re working with latex paint, adding a little water can solve that problem.

In the case of enamel paint, it isn’t convenient to add solvents to the formula. You may end up ruining the painting.

Low Odor

In addition, the paint you’re going to use must have a low odor. Bathrooms are usually small spaces. If the paint has a strong odor, the gases will concentrate in that small space. Over time, you’ll begin to experience some side effects like confusion, dizziness, and nausea. In the worst case, you may experience fainting or severe allergic reactions.

Therefore, it’s convenient to keep doors and windows open during the painting process. Usually, latex paints have a low odor. So, you have nothing to worry about when you apply then on bathroom ceilings.

However, when you apply oil-based or acrylic paint, you certainly need to be careful with the odor.

Color

In addition, the color of the paint must blend with the overall color of your bathroom. In the case of bathroom ceilings, the clearer the color, the better. Usually the bathroom luminaires are on the ceiling. If the color is too dark, it will absorb most of the light. So, your bathroom will look too dark all the time.

On the other hand, a clear color better reflects light. So, your bathroom won’t need too many luminaires to guarantee uniform lighting. Therefore, white is the best paint color for small bathroom with no windows. However, light colors don’t hide stains as well as dark tones.

So, you’ll have to touch up the paint on your ceilings very frequently to hide stains and other defects.

Mold Resistant

Also, best paint sheen for bathroom must be mold resistant. You can verify this feature on the label of the product. Mold tends to proliferate in spaces exposed to high humidity, like bathrooms. Mold resistant paints contain fungicides and other additional components to prevent this proliferation.

However, some types of paints aren’t naturally resistant to mold. In these cases, it’s convenient to apply a coat of anti-mold paint before the final coat of paint. Also, you can combine the paint with some special additives. They’re very cheap and you can find them on the Internet or any hardware store.

Waterproof

In addition, to prevent mold growth on the surface, the best paint finish for ceilings must be waterproof. Unfortunately, matte paints aren’t waterproof. So, there’s a greater probability of mold growth on latex paint.

On the other hand, oil-based and acrylic paints are waterproof. They leave a smooth and non-porous finish on the surface. So, you can easily clean the surface with a dry cloth soaked in soapy water.

Brand

Certainly, the market is infested with generic paints. Most of these products are made with low quality materials. Also, their formulas are too dilute. So, you’ll need to apply too many coats of paint to get a decent result.

If you don’t want to take risks, always opt for the best brands of best paint finish for bathrooms. If you don’t know much about paint brands, don’t worry. Any option on the top 7 list of this guide is good for you.

Reviews

Before buying any type of paint, it’s advisable to take a look to some Internet reviews. There, you can find interesting information about performance, consistency and other features of the paint.

You can find many reviews on shopping websites or review websites like this. It’s also convenient to consider different points of view on a certain product. So, never ignore negative opinions. A so compares the number of good reviews vs. bad reviews.

If most buyers have good opinions about the product, then buy. On the other hand, if most of the opinions are bad, better choose another product.

Price

Once you find the best paint finish for bathroom, it’s time to compare prices. The Internet is the best place to find prices. You can visit shopping websites or the official website of the product.  You can also visit some hardware stores if you want. Certainly, the more alternatives you have, the better.

Never choose the most expensive or cheapest paint. That would be the worst decision. Better calculate the average value of prices. Then, choose the paint with the price closest to the calculated value.

Prevent Mold Paint for Bathroom Ceiling FAQs

Certainly, learning everything about paint for bathroom ceiling isn’t easy. If you still have questions about this topic, don’t worry. You’ll find all the answers you need on this FAQs section.

Q1. Which are the most desired features on paint for bathroom ceiling?

Certainly, the most desired features on paint for bathroom ceiling are high performance, thick consistency and low odor.

Q2. Why is paint for bathroom ceiling thicker than regular paint?

Paint for bathroom ceiling is thicker to resist the effect of gravity. If the paint is very liquid, it will drip after application.

Q3. How many coats of paint do you need to apply on bathroom ceilings?

It all depends on the coverage of the paint. Usually 2 coats of paint are more than enough.

Q4. How long does paint for bathroom ceiling take to dry?

Usually paint for bathroom ceiling takes 1 hour to completely dry.

Final Verdict

Certainly, there are many types of paint you can apply on bathroom ceilings. However, to get the best results, you must choose the best of the best. So, carefully follow the tips in this buying guide to make the best decision.


Read similar buyer’s guide from here.

Filed Under: Home Tools, Reviews

5 Best Ways of filling in Dirt Around Foundation

Last Updated: July 4, 2019 | Joshua Houtson

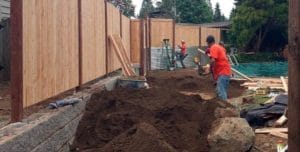
The rims of a house’s basis are a superior real estate for growing plants and herbs, though frequently include inadequate dirt situations. Dirt compression from the initial formation and corrosion by rain running down the roof are the most obvious reasons for causing the hassle.

However, it is likely to expand the soil to enhance the position for foundation sowing. While, that too, with great attention to make certain the uprightness of the home and its practical systems are never endangered.

As a result, it is necessary to start filling in dirt around the foundation of a home for a better outcome. You can know in details about dirt to use around foundation the home, if you are interested or if you need.

filling in dirt around foundation

What is Dirt of a Home Foundation?

Every residence has a basis, and each basis should be built efficaciously, competently and correctly to last longer. Since the substances that build up the building and the technique of constructing it are crucial.

In contrast, one thing which is frequently not noted is the dirt supporting them since even the basis of a building needs to be solid. Each sort of dirt has distinct attributes that have an effect on foundations in another way.

Usually, dirt might be greatly solid, the more rocky and dense earth, the more it incorporates in making a solid foundation for a home.

Best Ways for Filling in Dirt Around Foundation

The best 5 ways for filling in dirt around any foundation are:

1. Strip System

The usual routine in strip system is to put a lesser sturdy concrete as feasible into channels after which to construct from that with cinder block until floor level. While the walls transfer to stone or even brick or the selected exterior cladding ought to be. Hence, that is called a strip system.

In contrast, for a one-story constructing strip system will conventionally be 450 mm broad and at the very least about 200 mm depth. Also, for double stories about 600 mm broad and 200 mm in depth. Also, it is divided into two sub-systems that are deep strip and wide strip.

2. Trenchill System

An extensively used way is the trenchill system, where the channels are full of blended concrete to a below floor level. Metal reinforcement can be included in regions near to plants and trees.

While trenchill technique saves on hard work, it will include the general value of the foundations. Simply above floor level, the foundations are covered with a humid-proof way and afterward, the floor is hardened.

3. Raft System

Just like its name, a raft is created to ‘flow’ at the floor below. The composition is created with an extra-dense ground slab, bolstered by using clumps on metal reinforcing.

Furthermore, rafts possess the benefit of giving the foundation of a floor solution and not simply wall channeling. However, they are computed to be instead complicated to assemble.

A concrete raft is utilized wherein the dirt needs such a huge posture space that broad strip systems are unfolding too far. Consequently, making it greater within the budget to flow one massive bolstered concrete slab.

4. Piled System

A few house-builders utilize the piled system on each area online due to the fact the prices are foreseeable. Piles are pushed into the floor and then with charged concrete, so the complete foundation gets crowned with a floor beam to construct off.

Types of Piled System

Piled system has further two types that are as below described. Hope you can know few more details about the system.

i) Short-Bore Piles and Beam

These are commonly three-meter lengthy and may be strengthened with metal. Every pile is afterward fixed at the top through a formed straight beam of bolstered concrete. Hence, a suspended bolstered concrete floor may later be constructed using formed elements or forged in situ.

ii) Friction Pile

The comparable concept like short bore piles and beam utilized in conditions wherein there’s no fit bearing layer at a suitable intensity. Friction piles depend on skin-resistant towards the dirt.

5. Pad System

They are utilized when remoted masses require to be assisted, for example, to aid the support of metal or submit and beam structure home. The mass is focused on a tiny place instead.

Building solid foundations required to be on solid and strong dirt. However, dirt range in sturdiness. Due to the reason that some dirt is capable of assisting a skyscraper to stand tall, while other dirt is not even capable of supporting the burden of a human.

Conclusion

Hence, if the dirt under a building especially a home is not strong, the base of the building may even break, sink, or even worse–the building may fall. Therefore, it is necessary to use a sturdy method for filling in dirt around foundation.

Filed Under: Blog, Home Tools

Do You Know What to Put Around Foundation of House?

Last Updated: June 10, 2019 | Joshua Houtson

Apart from aesthetic purposes, effective landscaping around the foundation of a house can help your house last longer by adding to it more years. The immediate query is how to perform landscaping around your house. There are numerous landscaping ideas to help protect your foundation and still keep your yard attractive, but in this article, we will review the top-notch tips. Let’s dive to the heart of the matter.

What to put around foundation of house

Grade Your Landscape Perfectly

Apparently, water is the most challenger to the house foundation. It is good to pay close attention to the runoff water from the rain or during the tending of your flower buds. Proper sloping of land will help safeguard your foundation. Still, stormwater can contribute to all these issues, but if the runoff water flows towards the foundation, then know how to fix it instantly.

Locate Large Trees Away from the Foundation

While trees offer great benefits to us, they can be a great enemy to a foundation. Trees, as well as shrubs, offer us shade, prevent erosion of soil and maintain the beauty of the environment. Nevertheless, deeprooted and spreading trees don’t match with a foundation at all. To add on that, foundation assessment involves a number of considerations.

First, get to know the species of the tree around. Second, the soil structure of the property and lastly, the distance between the foundation and the tree. Before planting trees around your house, take into consideration the type of the tree as some of them have damaging effects while others lack.

Revamp Your Gutter System, As Well As Extensions

Gutter extensions, help push water some feet away from your foundation. Installing downspouts help carry the runoff water further which can erode your slope. Still, rain barrels are a better choice for collecting rainwater. In addition to protecting your foundation, the collected rainwater can be preserved and used for other purposes such as irrigation. With this, the monthly water bill is reduced as well.

Landscape Each Side of the House

Landscaping one side of your yard results in foundation problems. Why? This is because the rainwater collects in that area. As a consequence, the soil expands pushing the water against the foundation causing a lot of problems. Because of this, try to landscape every side of your house to avoid soil expansion and destruction of structures.

Cover the Flower Beds

Mulching is simply covering your beds for the purpose of retaining water during excessive heat. Dry soil causes water movement to a greater extent which can damage your foundation. Mulching is packed with a lot of benefits other than protecting your foundation. It enriches the soil by providing necessary nutrients for plant growth.

Create Swales

These are drainage troughs that are easiest to install to protect your damage. However, a swale should have these features; Along the sloping banks’ add plants to improve drainage and water absorption. Yet, try to use fast moving draining soil to absorb the water draining.

To keep your house, maintaining your house foundation is a vital practice. I hope you find this information helpful which answers the query,” what to put around foundation of house.” Implementing these tips will help avoid structural problems which are certainly costly.

Filed Under: Blog, Home Tools

How to Build Up Dirt Around Foundation?

Last Updated: April 5, 2019 | Joshua Houtson

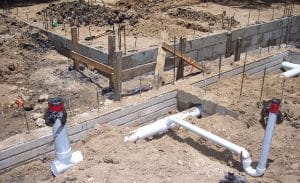
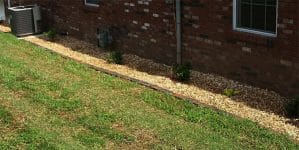
It’s never a good thing to have water flowing into your foundation. It either sits there and gradually weakens the structure or leaks in through existing holes or cracks to cause moisture problems in your basement.

Now, one of the best drainage improvement methods is to grade the soil around your house using dirt.

By grading the landscape around the home, water will find it easier to flow away from your house saving you from potential disaster.

Here is how to use dirt to grade your home foundation:

Requirements:

  • 10-foot wood board
  • A level
  • Tape measure
  • Writing paper/pen
  • Dirt

Step 1: Measure The Current Slope

Measure the current slope as determined by the soil surrounding the house to assess the amount by which the soil grade requires to be raised.

Take your 10-foot wood board and set its first end on the ground immediately next to your house’s foundation.

Now place the level at an ideal spot on top of your board.  Next, lift the other end of the 10-foot board until your level reads that the board is evenly positioned.

To complete, measure the distance from where the board ends to the ground and record the findings.

Step 2: Decide On the Amount of Sloping Desired

Now you need to make the crucial decision: how much sloping do you want for your house?

Here is the tricky bit:

The minimum recommendations regarding the soil grading around homes vary depending on location. However, it’s generally agreed that the more sloping away your home is, the better it is as far as reducing moisture problems is concerned.

To move forward, let’s take an example:

Assuming you got a 2-inch distance from the edge of the board to the ground in the previous step, you would definitely want to raise the grade so perhaps the new distance should be 4”, 5” or even 6-inches.

Tip: You can consult a local grading professional for advice on the ideal grading if everything else fails.

Step 3: Build Up The Foundation Soil Grade To The Desired Distance

Now start building up the prevailing soil grade around the house by dumping soil dirt right up to against the foundation. You will add adequate soil to the ground right by the foundation so as to establish a good base before measuring the distance from the base, still with your 10-foot board to check the new difference in the sloping.

If you’re not satisfied, add some more dirt then repeat the measurements.

When okay with your new soil grade, proceed to build the dirt up around the whole foundation to the new height.

Step 4: Fill The Remaining Area

Now fill in the remaining area around your house’s foundation to about 10-feet out from where the perimeter of your house is. Add dirt to the lower heights while moving out away from your house to build a steady but gradual slope.

Step 5: Check For Consistency

Once you complete, lay the 10-foot board once more over the ground and measure the slope.

You should ensure that the board is sloped down flat without any drips or holes beneath it as you do this.

Check the slope all round at 1-foot intervals so as to be sure of a consistent slope around the entire home.

Conclusion

There go the steps on how to use dirt to grade your home’s foundation. As you can see, it’s pretty straightforward.

It’s however always good to consult a professional if stuck.

Filed Under: Blog, Home Tools

  • Go to page 1
  • Go to page 2
  • Go to Next Page »

Recent Buying Guides

  • Best Sports Bra for Saggy Breasts in 2021 – Reviews & Buying Guide
  • 11 Best Over the Knee Boots for Petites in 2021 – Reviews & Buying Guide
  • Best Miter Saw For Beginners in 2021 – Reviews & Buying Guide
  • Best Hand Saw For Cutting Trees in 2021 – Reviews & Buying Guide
  • Best Miter Saw Blade for Trim Reviews in 2021 & Buying Guide
  • Best 12 Inch Miter Saw Blade Reviews 2021 & Buying Guide
  • Best Table Saw Under $500 in 2021 – Reviews & Buying Guide

Homenorm is reader-supported website. When you buy through links on our site, we may earn an affiliate commission. Learn more.

  • About Us
  • Image Credits
  • Affiliate Disclosure
  • Contact Us
  • Privacy Policy

Copyright © 2021 · Home Norm · All rights reserved.

Featured on Hometalk.com DMCA.com Protection Status

My website is a participant in the Amazon Services LLC Associates Program, an affiliate advertising program designed to provide a means for sites to earn advertising fees by advertising and linking to Amazon.com.